본격적으로 redux toolkit을 이용하여 간단한 sns 앱을 만들어보겠습니다.
redux와 redux toolkit을 먼저 설치합니다. react와 typescript를 사용했으며 css는 라이브러리는 tailwind를 사용했습니다.
npm i @reduxjs/toolkit react-redux
PostsReducer
먼저 features/postsSlice.ts를 만들어 slice를 생성합니다. 또한 initialState를 생성하여 더미 데이터를 추가합니다. reducers는 아직 비어있는 상태입니다.
// features/postsSlice.ts
import { createSlice } from '@reduxjs/toolkit';

const initialState: Post[] = [
  {
    id: '1',
    title:
      'sunt aut facere repellat provident occaecati excepturi optio reprehenderit',
    content:
      'quia et suscipit\nsuscipit recusandae consequuntur expedita et cum\nreprehenderit molestiae ut ut quas totam\nnostrum rerum est autem sunt rem eveniet architecto"',
  },
  {
    id: '2',
    title: 'qui est esse',
    content:
      'est rerum tempore vitae\nsequi sint nihil reprehenderit dolor beatae ea dolores neque\nfugiat blanditiis voluptate porro vel nihil molestiae ut reiciendis\nqui aperiam non debitis possimus qui neque nisi nulla',
  },
];

const postsSlice = createSlice({
  name: 'posts',
  initialState,
  reducers: {},
});

export default postsSlice.reducer;app/store.ts에서 configureStore를 이용해 스토어를 생성한 후에 postsSlice를 posts 리듀서에 추가합니다.
// app/store.ts
import { configureStore } from '@reduxjs/toolkit';
import postsSlice from 'features/postsSlice';

export const store = configureStore({
  reducer: { posts: postsSlice },
});

// store에서 상태와 dispatch 타입을 가져와 커스텀 훅 `withTypes`에 전달합니다.
export type RootState = ReturnType<typeof store.getState>;
export type AppDispatch = typeof store.dispatch;
// hooks/index.ts
import { useDispatch, useSelector } from 'react-redux';
import { AppDispatch, RootState } from '../store';
export const useAppDispatch = useDispatch.withTypes<AppDispatch>();
export const useAppSelector = useSelector.withTypes<RootState>();이제 App 컴포넌트를 provider로 감싼 후에 store를 전달하면 브라우저에서 Redux DevTools Extension을 통해 posts 상태를 확인할 수 있습니다.
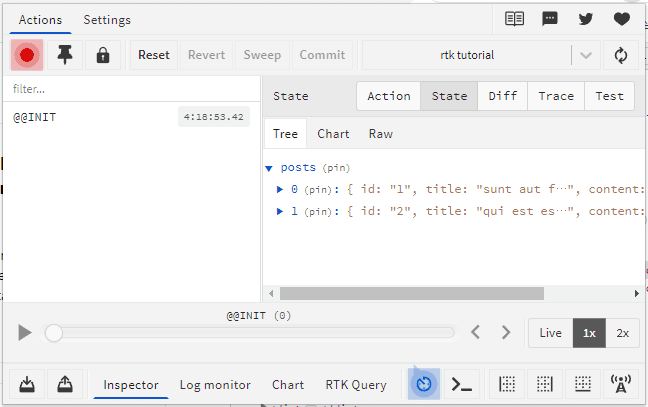
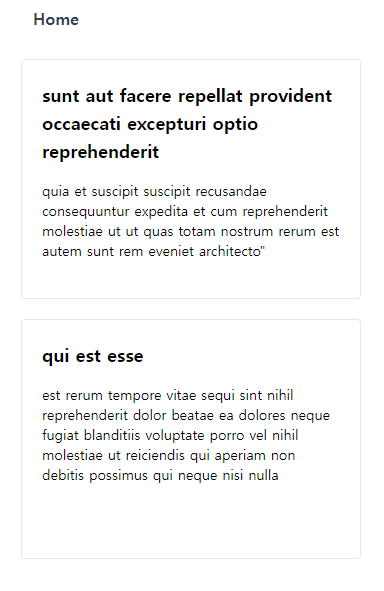
지금까지 렌더링 화면은 다음과 같습니다.
게시글을 등록하기 위해서는 postsSlice에서 게시글 등록 액션을 추가해야 합니다. postAdded 함수는 state와 action 두 개의 매개변수를 받고 action.payload에는 생성할 post의 정보가 전달됩니다. createSlice 안에서 push를 사용하여 불변성을 지키지 않아도 되는 이유는 내부적으로 immer 라이브러리를 사용하여 안전하게 불변성을 지키기 때문입니다.
// features/postsSlice.ts
// 코드 생략
const postsSlice = createSlice({
  name: 'posts',
  initialState,
  reducers: {
    postAdded(state, action: PayloadAction<Post>) {
      state.push(action.payload);
    },
  },
});

export const { postAdded } = postsSlice.actions;
postAdded 액션을 export 하여 외부 컴포넌트에서 사용할 수 있게 합니다. 이제 PostForm 컴포넌트로 돌아가 이벤트 핸들러에 postAdded 액션을 디스패치하는 코드를 추가시킵니다.
nanoid
// 코드 생략
import { nanoid } from '@reduxjs/toolkit';
import { postAdded } from 'features/postsSlice';

export default function PostForm() {
  // 코드 생략

  const handlePostSave = (e: React.FormEvent) => {
    e.preventDefault();
    if (title && content) {
      dispatch(postAdded({ id: nanoid(), title, content }));
      setTitle('');
      setContent('');
    }
  };
  // 코드 생략
}
데이터베이스는 id 값이 자동으로 증가되지만, 현재는 로컬 상태이므로 id 값을 넣어주어야 합니다. redux toolkit의 nanoid는 유니크한 값을 생성하기 때문에 nanoid를 사용하여 id 값을 추가하였습니다.
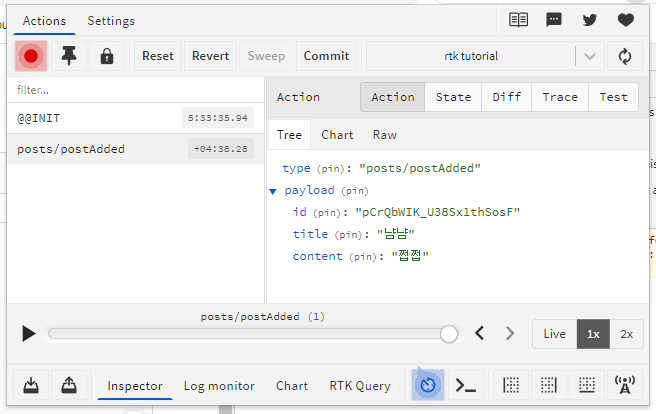
submit하면 posts/postAdded 액션이 정상적으로 디스패치되는 걸 확인할 수 있습니다.
아래 코드는 SinglePostPage 컴포넌트를 생성하고 useParams를 이용해 postId를 받고, useAppSelector에서 Array.find를 이용하여 postId와 일치하는 post를 전달받는 예시입니다. useAppSelector는 반환하는 참조의 값이 변경될 때마다 컴포넌트가 다시 렌더링 됩니다.
import { useParams } from 'react-router-dom';
import { useAppSelector } from 'hooks';
import PostItem from 'components/posts/PostItem';

export default function SinglePostPage() {
  const { postId } = useParams();

  const post = useAppSelector((state) =>
    state.posts.find((p) => p.id === postId),
  );

  if (!post) {
    return (
      <section>
        <h2>Post not found!</h2>
      </section>
    );
  }

  return (
    <section>
      <PostItem post={post} />
    </section>
  );
}
이제 postUpdated 리듀서 함수를 생성하겠습니다.
// features/postsSlice.ts
const postsSlice = createSlice({
  name: 'posts',
  initialState,
  reducers: {
    postAdded(state, action: PayloadAction<Post>) {
      state.push(action.payload);
    },
    postUpdated(state, action: PayloadAction<Post>) {
      const { content, id, title } = action.payload;
      const existingPost = state.find((post) => post.id === id);
      if (existingPost) {
        existingPost.title = title;
        existingPost.content = content;
      }
    },
  },
});action.payload에서 post 정보를 받아와 일치하는 포스트를 찾아 수정하는 코드입니다.
prepare
현재 PostForm 컴포넌트에서는 디스패치 전에 nanoid를 이용하여 id를 생성하고 postAdded 액션을 디스패치 하고 있습니다. 만약 여러 개의 다른 컴포넌트에서도 동일한 액션을 디스패치하거나 payload의 로직이 복잡하다면 반복되는 코드의 양이 많아 좋지 못합니다. prepare를 이용하면 이러한 문제를 해결할 수 있습니다.
const postsSlice = createSlice({
  name: 'posts',
  initialState,
  reducers: {
    postAdded: {
      reducer(state, action: PayloadAction<Post>) {
        state.push(action.payload);
      },
      prepare(title, content) {
        return {
          payload: {
            id: nanoid(),
            title,
            content,
          },
        };
      },
    },
    // 코드 생략
  },
});prepare를 사용하면 store에 action.payload가 전달되기 전에(미들웨어와 같은) 추가 작업을 진행할 수 있습니다.
// components/posts/PostForm.tsx
const handlePostSave = (e: React.FormEvent) => {
  // 코드생략
  dispatch(postAdded(title, content));
  // 코드생략
};
이제 postAdded 액션 함수는 2개의 인수(title,content)를 받습는다.
UsersReducer
usersSlice를 생성 후 스토어에 추가합니다.
// features/usersSlice.ts
import { createSlice } from '@reduxjs/toolkit';

const initialState: User[] = [
  {
    id: '1',
    name: 'Leanne Graham',
  },
  {
    id: '2',
    name: 'Ervin Howell',
  },
  {
    id: '3',
    name: 'Clementine Bauch',
  },
];

const usersSlice = createSlice({
  name: 'users',
  initialState,
  reducers: {},
});

export default usersSlice.reducer;
// app/store.ts
import { configureStore } from '@reduxjs/toolkit';
import postsSlice from 'features/postsSlice';
import usersSlice from 'features/usersSlice';
export const store = configureStore({
reducer: { posts: postsSlice, users: usersSlice },
});스토어에 유저 상태가 추가되었으므로 포스트를 등록할 때 유저를 선택할 수 있도록 postAdded 리듀서에 userId를 추가합니다. PostForm 컴포넌트에도 userId를 선택할 수 있는 양식을 추가합니다. 추가로 포스트 작성일을 확인하기 위해 prepare 함수에 date 코드를 추가 작성하였습니다.
const postsSlice = createSlice({
name: 'posts',
initialState,
reducers: {
postAdded: {
reducer(state, action: PayloadAction<Post>) {
state.push(action.payload);
},
prepare(title, content, userId) {
return {
payload: {
id: nanoid(),
date: new Date().toISOString(),
title,
content,
userId,
},
};
},
},
// 코드 생략
},
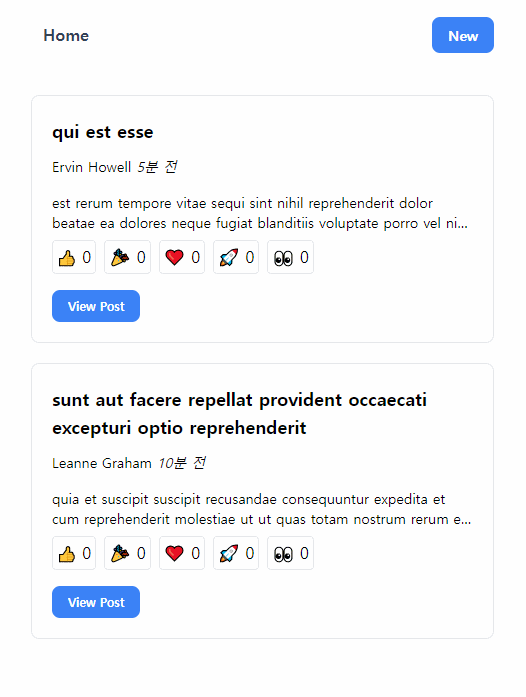
});사용자가 포스트에 이모티콘을 추가할 수 있도록 ReactionButtons 컴포넌트를 만듭니다. reactionEmoji 객체는 키와 이모지로 구성되어 있는데 Object.entries 메서드를 이용하여 배열로 변경하고 map 반복문을 돌려 button을 생성하였습니다. 버튼을 클릭하면 reactionAdded 액션을 디스패치하게 되는데 이때 해당 post를 찾기 위해 id 값과 emoji count 증가를 위해 emoji name을 넘겨줍니다.
import { reactionAdded } from 'features/postsSlice';
import { useAppDispatch } from 'hooks';

const reactionEmoji = {
  thumbsUp: '👍',
  hooray: '🎉',
  heart: '❤️',
  rocket: '🚀',
  eyes: '👀',
};

export default function ReactionButtons({ post }: { post: Post }) {
  const dispatch = useAppDispatch();

  const handleReactionAdd = (name: string) => {
    dispatch(reactionAdded({ id: post.id, key: name }));
  };

  return (
    <div className="mt-2 flex gap-x-2">
      {Object.entries(reactionEmoji).map(([name, emoji]) => (
        <button
          onClick={() => handleReactionAdd(name)}
          className="rounded border p-1"
          type="button"
          key={name}
        >
          {emoji} {post.reactions[name as keyof typeof reactionEmoji]}
        </button>
      ))}
    </div>
  );
}
마지막으로 reactions 객체를 추가하여 더미 데이터의 값과 prepare 함수에 각각 추가합니다. reactionAdded 액션을 만들어 payload는 id와 key를 받고 해당 post를 찾아 값을 변경하도록 코드를 작성합니다.
// features/postsSlice.ts
const reactions = {
  eyes: 0,
  heart: 0,
  hooray: 0,
  rocket: 0,
  thumbsUp: 0,
};

const initialState: Post[] = [
  {
    id: '1',
    title:
      'sunt aut facere repellat provident occaecati excepturi optio reprehenderit',
    content:
      'quia et suscipit\nsuscipit recusandae consequuntur expedita et cum\nreprehenderit molestiae ut ut quas totam\nnostrum rerum est autem sunt rem eveniet architecto"',
    userId: '1',
    date: sub(new Date(), { minutes: 10 }).toISOString(),
    reactions,
  },
  {
    id: '2',
    title: 'qui est esse',
    content:
      'est rerum tempore vitae\nsequi sint nihil reprehenderit dolor beatae ea dolores neque\nfugiat blanditiis voluptate porro vel nihil molestiae ut reiciendis\nqui aperiam non debitis possimus qui neque nisi nulla',
    userId: '2',
    date: sub(new Date(), { minutes: 5 }).toISOString(),
    reactions,
  },
];

const postsSlice = createSlice({
  name: 'posts',
  initialState,
  reducers: {
    postAdded: {
      reducer(state, action: PayloadAction<Post>) {
        state.push(action.payload);
      },
      prepare(title, content, userId) {
        return {
          payload: {
            id: nanoid(),
            date: new Date().toISOString(),
            title,
            content,
            userId,
            reactions,
          },
        };
      },
    },
    reactionAdded(state, action: PayloadAction<{ id: string; key: string }>) {
      const { id, key } = action.payload;
      const existingPost = state.find((post) => post.id === id);
      if (existingPost) {
        existingPost.reactions[key as keyof typeof reactions] += 1;
      }
    },
    // 코드 생략
  },
});